In the morning I continued doing the reback by making the hollow tube for it along with re-working some of the flow charts I had made as part of my practicum assignments outside of working in the department. Sharlane and I worked on updating some of the information before giving tours to potential IMLS students. The tour provided me with another way to learn some of the alternative methods the library uses to mend books. For instance, when a book is brittle and another copy can be found digitized on the internet (such as google books), that books is printed and bound as a new book (using the modern binding style-double-fan adhesive). A note is attached in the front about its origins for legal purposes.
Around 1:30pm we continued book making with cutting the twine about an 1 1/2 inches from the edge of the spine, it is okay if it is slightly less than this, but it may make attaching the board a little difficult later. Most of the time this is done when you remove the item from the frame, but since I completed my sewing at home, I ended up waiting until later.
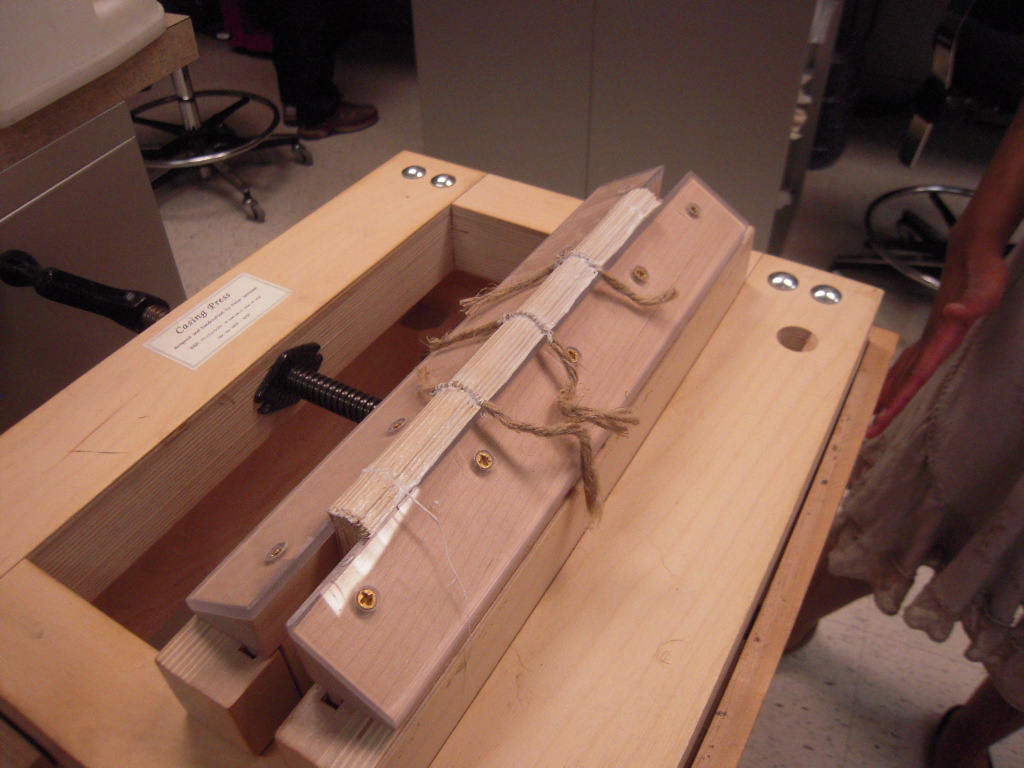
After that we placed our books in the press that has slanted board edges, for creating a rounded spine. This is done by rounding the spine in your hands, then carefully placing the book to the edge of the boards and securing the press on the item. The book should be evenly spaced on both sides, matching the rounding on each side as well as the amount it sticks up beyond the board (this provides overhang for the gutter to form) . This may take a few tries. The end result should look like this:


Sharlane takes out one side of the board in order to line up the book properly.

She then corrects it from the under side before completely tightening the book into place.

Using a backing hammer, run the ends down to force it to round. This will make a shoulder that the boards will be placed in at a later point. When using the hammer, apply a little force, but do not hammer the book because it can break the stitching.


It should look like this when its finished (perhaps with a little less of a point at the top of the rounding).
-Coat the spine evenly with PVA. Avoid getting glue on the twine, though a little bit is okay.

Next we picked out the leather/faux leather while the glue dried.
Coming back to the book, we measured out Japanese tissue to the size of the spine with the fibers going down the spine. Measure out the tissue from the end of the spine to the first piece of cord (twine) and cut the piece. Apply glue to one side of the tissue, line it up with the spine and place down. Continue cutting the spine piece to size without going over the cords, and gluing the pieces down. When finished, it should look like this:


At this point in traditional book making you would sew in the headbands and page marker, but today they are purely decorative and can be glued. Glue (PVA) a piece of ribbon on the spine extending about an inch down for a page marker (make sure the ribbon extends past the bottom of the book when placed in the center of the pages). You can also glue (PVA) headbands on the spine. This is done by cutting two pieces to the width of the spine, or a little over. Then brush glue on one side of the band, not including the decorative portion. Place the band so that the decorative portion (where the fabric has been folded and sewn closed) sticks up beyond the text block.
You can make your own headbands like I did for mine by taking paper or fabric, cutting it to the width of the spine and about an inch and a half long. Glue half of the piece and place a piece of twine towards the center. Then fold over the paper and bone folder up to the twine piece.
For my book, I needed to cut the end sheets to the exact size of the text block because I left extra space when I first cut the paper to size. I did this by positioning a straight edge between the paper and end sheet and cutting along that edge so that it came to the same level as the paper of the text block.
Next we cut the boards for the case using a medium weight board because the books are moderate size.
-To do this you position the book on top of the board and mark the length so that you have about an 1/8 inch beyond the top and bottom edges.
-Then you position the board in the shoulder created by the book rounding earlier and mark about an 1/8 inch beyond the foredge of the book.
-Set the size with the cutter and cut the two pieces at once.
Now you are ready to start attaching the board to the text block.
-Position the board so that it has an even amount of spacing on either side and mark where the cord falls.
-You will use the scalpel to cut out a V (triangle) about 1/3 of an inch long and through a little less than half of the board's thickness (through a layer or two). This way the twine doesn't stick out around the side of the board.
-Next you need to get a scrap piece of board and cut the twine if you have not already so that each piece is 1 1/2 inches.
-Come the twine out over the scrap board using an awl. Sometimes it is necessary to thin the twine by lightly scraping the surface with a scalpel.

-Make a large hole slightly above each of the Vs with an awl. (You can also take away a little board here to ease getting the cord through the board.)
-Wet the cord slightly and twist the frayed pieces together, then lasso the cord by knotting string around it (the same used to sew the spine) and thread a needle on the other side.
-Sew the twine through the hole. This may take some time, but try not to force it. You can use an awl to grab at the cord as it's being pulled through.
- Repeat the last three steps, but make the hole slightly above and to the side as shown below.
-Bone folder the board so that it no longer bubbles around the cord.
-To finish, glue the twine down with wheat paste, fanning out the cord so that it does not show through when you cover the board later. You can also bone folder this down to help get rid of the lump created by the twine. Put the item under weights-shown below.


At this point I covered the center of the end sheet where the string had ripped by using a scrap piece of the marbled paper cut to the same length. I glued the piece in with PVA and used the bone folder to create a crease to that it can close.

I left the preservation department at 5:05pm.
*If any processes are repeated in my blog, it is because they were repeated during my practicum experience. I apologize for any redundancy.
No comments:
Post a Comment